 AI CEO Lab
HyperFrames Tutorial: Edit Videos With Codex in ChatGPT
A beginner HyperFrames tutorial for business owners. Set up Codex in the ChatGPT desktop app, render a 6-second test video, then turn a real talking-head recording into a reel with a written direction and a review checklist.
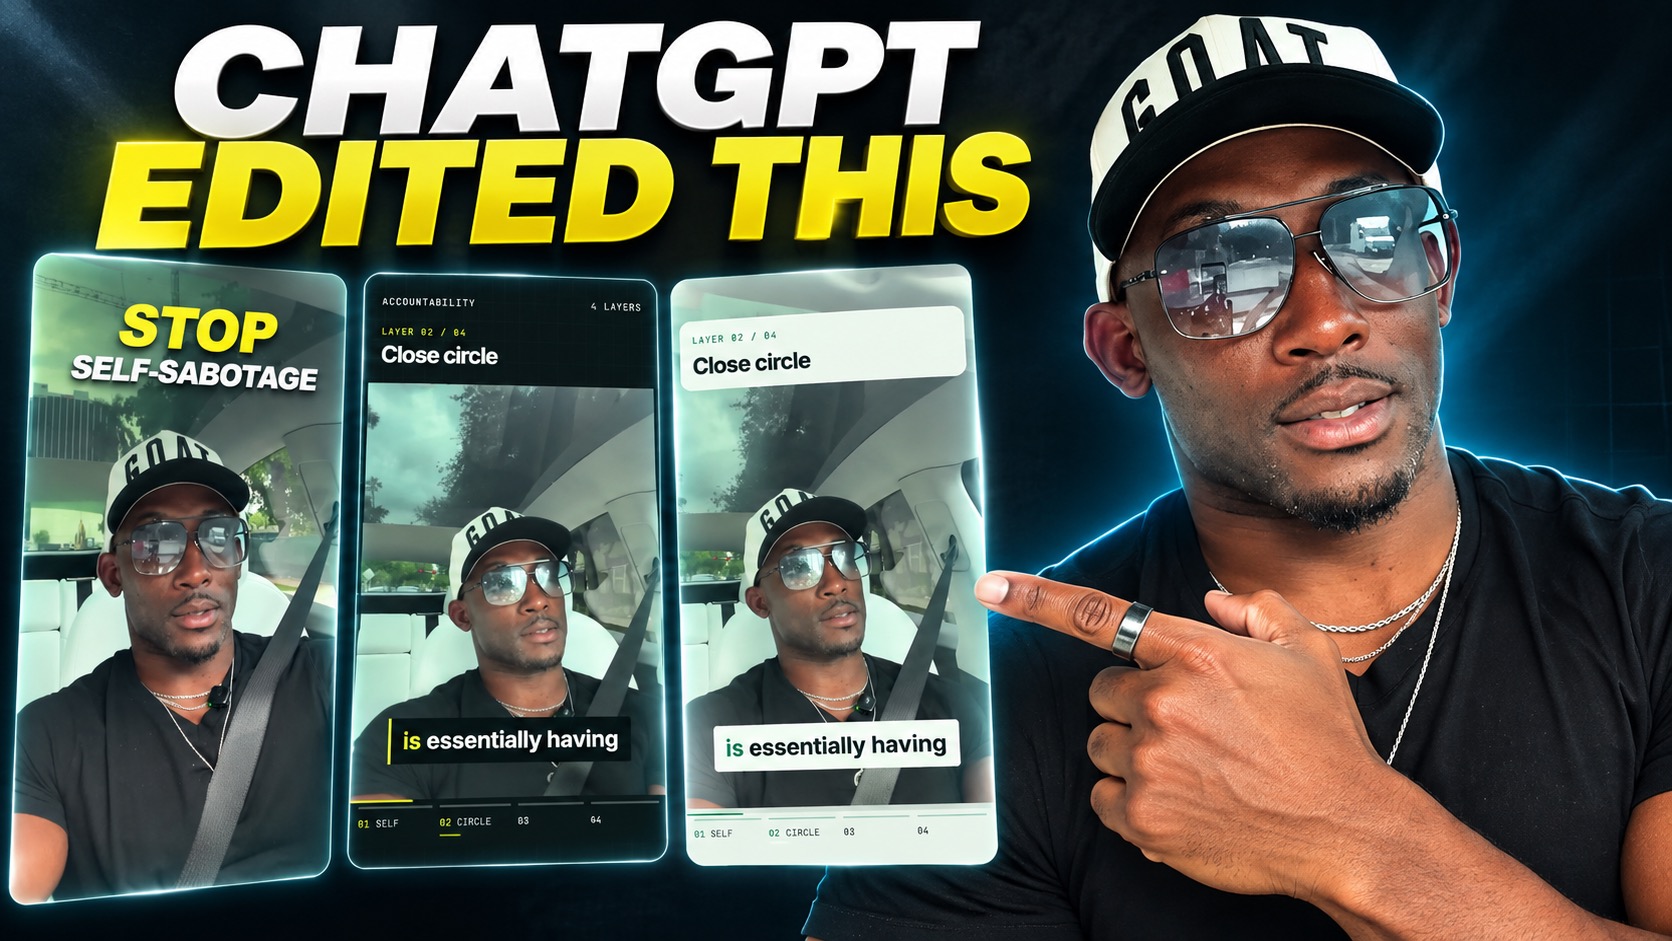
Recording wasn't what kept me from posting consistently. Editing was. I could have the idea, film the video, and still have nothing ready to put out.
So I built this workflow. For the videos I make with it, it has replaced my editors. I give the agent the footage and the direction, review what comes back, and tell it what to change. The agent does the cutting. I still decide what the video should say.
This HyperFrames tutorial walks you through it from zero: install two free tools, render a 6-second test video, then edit one real recording with a written direction and clear review rules. I'm a doctor, not an engineer, so every command below comes with a plain explanation.
New to HyperFrames or Codex? Start with the next section. It explains what each one is in plain English. Already rendering with HyperFrames? Skip to step 6 and write your direction.
What you have by the end
Not concepts. Things that exist on your machine when you close the tab.
- A plain-English picture of what HyperFrames, Codex and FFmpeg each do
- Codex set to ask before it acts outside your project folder
- A 6-second test video that proves your computer can render
- A one-page direction template you fill in before every edit
- One real recording cut, titled and reviewed, with the original untouched
- A review checklist you run on the exported file, not the preview
- A saved title style so the next video starts from your approved look
Start here: what HyperFrames and Codex are
If you've only used ChatGPT as a chat box, 5 ideas make the rest of this tutorial click.
What HyperFrames is
HyperFrames is a free, open-source tool from HeyGen that turns a web page into a video file. Its GitHub page describes it as a framework for turning HTML, CSS, media and animations into MP4 videos, with the tagline "Write HTML. Render video. Built for agents." It's Apache 2.0 licensed, so there's no seat fee.
In plain English: instead of dragging clips on a timeline, an AI agent writes a page that says which clip plays when, where the title sits and how it moves. HyperFrames turns that page into an MP4. You never have to read the code yourself.
What Codex is, and where it lives now
Codex is OpenAI's agent that works on files and runs commands on your computer. On 9 July 2026, OpenAI merged the Codex app into the ChatGPT desktop app for Mac and Windows, available on every ChatGPT plan, including Free (checked 15 September 2026). Codex is a separate mode inside that app, next to Chat.
Inside Codex you choose a folder to work in, and it can use the files there and run commands in a built-in terminal.
Chat vs Codex: why a regular chat can't do the edit
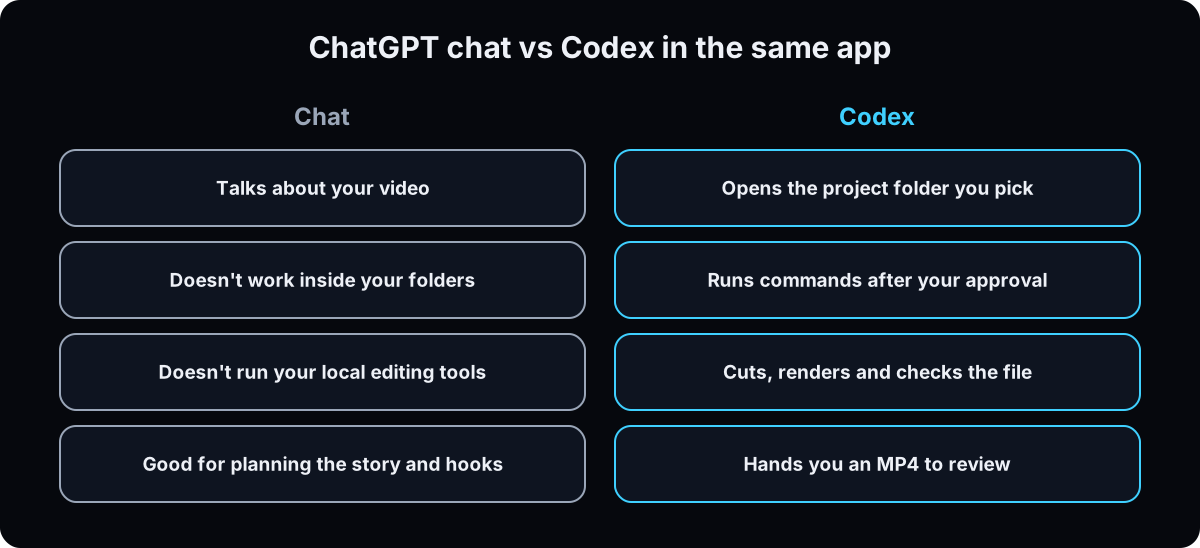 Both live in the same app, which is why people mix them up. A chat can help you pick the main point and write hook options. It doesn't open your project folder and run HyperFrames and FFmpeg on your footage. Codex does. Use chat to think, and Codex to do the edit.
How an AI edit works
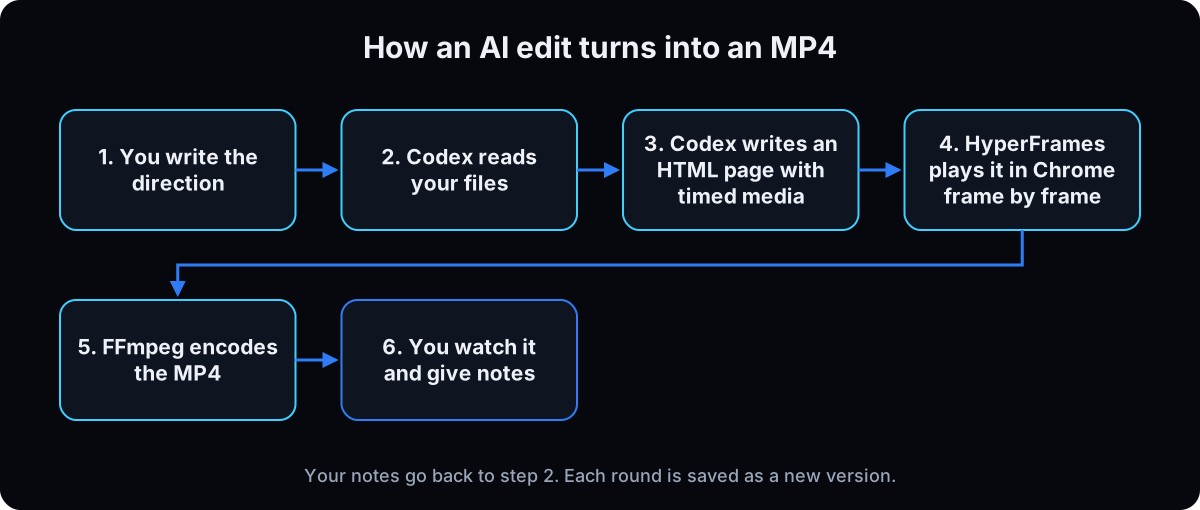 You write a short direction. Codex reads your recording and transcript, plans the cuts, and writes the page. HyperFrames opens that page in a hidden Chrome browser and captures it frame by frame, and FFmpeg (a free media tool) encodes the frames and audio into an MP4. You watch the result and give notes, and each round becomes a new version. HyperFrames ships agent skills that teach this loop to Codex, Claude Code and other coding agents.
HyperFrames vs Remotion
Remotion is the older tool that does the same job with React code. HyperFrames' own comparison page puts the difference simply: Remotion asks for React and TypeScript, while HyperFrames asks for HTML, CSS and JavaScript. Remotion's license is free for individuals and for-profit companies with up to 3 employees; bigger companies need a paid company license. HyperFrames is Apache 2.0 with no seat count. HeyGen's page also says Remotion has more templates, tutorials and production history. For a business owner letting an agent write the code, the license and the plain-HTML format are why this tutorial uses HyperFrames.
The catch: you still judge the edit
When a thread titled "So Claude can now edit videos and I'm having a bit of a panic attack" hit r/VideoEditing in September 2026, the top reply (503 upvotes) made the point this tutorial is built on: the value is "knowing what to edit, not controlling the software."
The agent handles the software. It doesn't know your audience, which sentence carries the point, or when a joke lands. That's why steps 6 and 12 matter more than the install. A render that passes every automated check can still be a boring video.
| HyperFrames | Remotion | |
|---|---|---|
| What you (or the agent) write | HTML, CSS and JavaScript | React and TypeScript |
| License (checked 15 Sep 2026) | Apache 2.0, no seat count | Free for individuals and companies up to 3 employees; paid above that |
| Made by | HeyGen | Remotion |
| Maturity | Newer | More templates, tutorials and production history |
| Best fit | An agent editing from plain web files | A team that already writes React |
| Term | What it means |
|---|---|
| HyperFrames | HeyGen's free, open-source tool that renders a web page into an MP4 video |
| Codex | OpenAI's agent that works in a folder on your computer and runs commands, now a mode in the ChatGPT desktop app |
| Composition | The HTML page that describes the video: which clip, title and sound plays when |
| Render | Turning the composition into a finished video file |
| FFmpeg | A free command-line tool that cuts, converts and encodes audio and video |
| Node.js | A free program that runs JavaScript tools like HyperFrames on your computer |
| Terminal | The text window where you type commands; Codex has one built in |
| Skill | Saved instructions an agent loads to do one kind of job the same way each time |
| Transcript with word timings | A text version of your video that records when each word starts and ends |
| Keep ranges | The start and end seconds of the parts of your recording you want to keep |
| Time map | A file that links each moment in the original to the same moment in the cut version |
| B-roll | Extra footage shown over your talking head to illustrate the point |
| Export | The final MP4 file you'd post, as opposed to the editing preview |
The mental model
One prompt should produce a perfect video and remove the need for review.
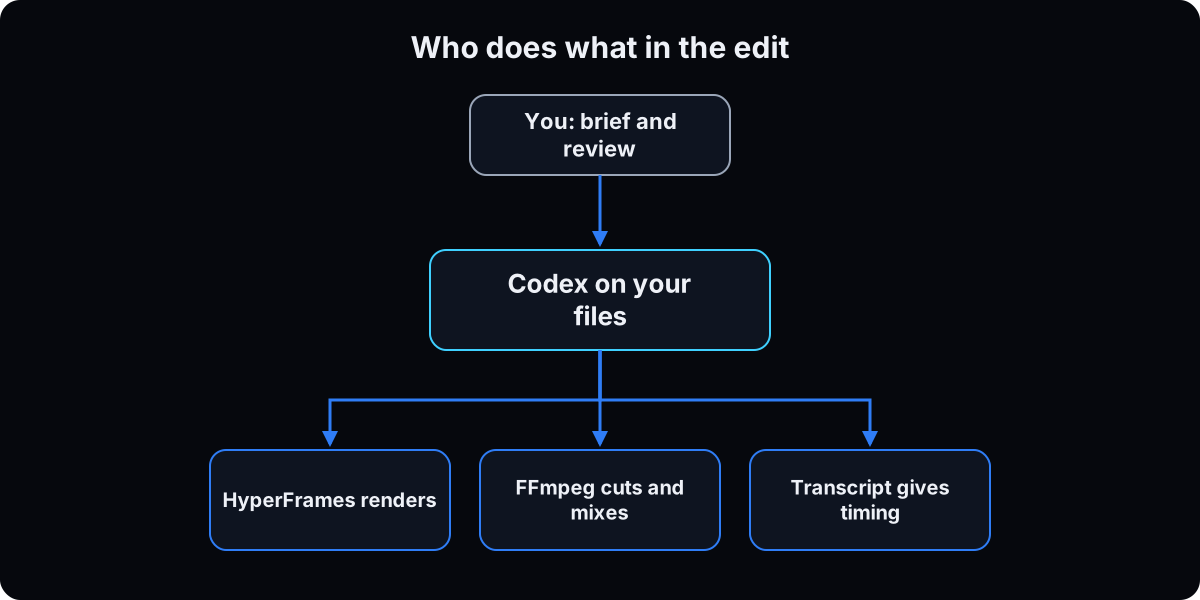 The agent does the edit. You decide the story and judge whether the result gets it across.
| Term | What it means |
|---|---|
| Codex | Works on your local files and runs the editing tools. |
| HyperFrames | Renders a video from an HTML page with timed media and graphics. |
| FFmpeg | Cuts, converts and mixes media. |
| Transcript | Supplies word timing, not editorial judgment. |
| You | Give the brief and review meaning, pacing and polish. |
Will this replace my video editor?
If Codex can cut, title and render my video, do I still need an editor?
For the videos I make with this workflow, it replaced mine. But the tool didn't replace the editing decisions. Those moved to me.
- The agent handles the software: cuts, timing, titles, rendering.
- You supply the judgment: the one point, the audience, what to cut and what to protect.
- The review step catches what automated checks miss: pacing, meaning and whether a graphic helps.
If you don't want to make those decisions, keep your editor and hand them this workflow.
From zero to your first reviewed reel
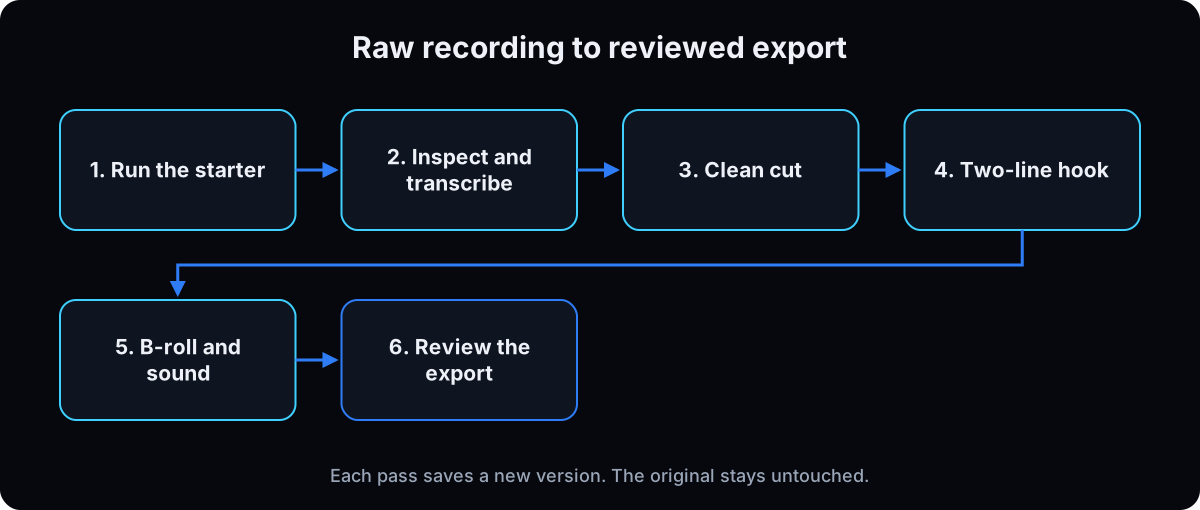
1. Get the ChatGPT desktop app and open Codex
 Download the ChatGPT desktop app for Mac or Windows and sign in. Since 9 July 2026, Codex is inside it on every plan, including Free. Switch from Chat to Codex, and start a new chat there.
Menu names can shift between app versions. If a label doesn't match, look for the closest one.
Why: the edit needs an agent that can work in a folder on your computer. The chat side of the app can't do that.
2. Set permissions before Codex touches your files
Check the permission menu in Codex before you give it any footage. Pick the option that asks for approval, and keep full access off. OpenAI's permissions docs describe a workspace profile that allows writes inside your project folder only, and a full-access profile that removes the sandbox and "should be used only when that broad access is intentional." Per the approvals docs, Codex asks before editing files outside the workspace or running commands that need the internet.
When it asks, read what it wants to run. Installing packages from npm needs the internet, so expect an approval request in step 4.
Why: your recordings and client footage live on this computer. The folder boundary keeps the agent inside the one project you chose. For more on setting limits, see AI agent guardrails.
3. Install Node.js 22 and FFmpeg (terminal step)
This is the only part that feels technical. You're installing 2 free programs: Node.js runs HyperFrames, and FFmpeg handles the audio and video. The HyperFrames README lists Node.js 22 or newer and FFmpeg as requirements. The starter in step 4 also uses Python 3 for its cutting script.
Node.js: download the LTS installer from nodejs.org and click through it like any app.
FFmpeg on a Mac: if you have Homebrew, run brew install ffmpeg. On Windows: run winget install ffmpeg, one of the options listed on gyan.dev.
Then paste the version checks below into the terminal in Codex, or ask Codex: "Check whether Node.js 22+, Python 3 and FFmpeg are installed, and tell me what's missing." Done when all 3 print a version number.
Why: if a tool is missing, every later step fails with a confusing error. Checking now saves you from debugging an edit that was never going to render.
node --version     # should say v22 or higher
python3 --version  # should say Python 3.something
ffmpeg -version    # should print a version, not "command not found"
4. Render a 6-second test before adding your footage
Get my free video-editing starter on GitHub. Use the green Code button and Download ZIP if you don't use git, then unzip it and open that folder in Codex. It includes a sample, a cutting script, a title preset, an editing brief and the workflow. Private footage, client media, soundboard files and credentials are left out.
Run the commands below from the starter folder, or ask Codex to run them. The sample is a 6-second silent title animation, so it needs no footage and no API key. The first install downloads the pieces it needs, and the first render may download a browser, so give it a few minutes.
Done when a new MP4 shows up in the renders folder and plays. If a command fails, paste the error into Codex and ask what's missing before moving on.
Why: a test with no footage proves your setup works. If something breaks later, you know it's the edit, not the install.
git clone https://github.com/drleadflow/aiceo-video-editing-starter.git
cd aiceo-video-editing-starter
npm install      # downloads HyperFrames and its helpers
npm run check    # checks the sample composition for errors
npm run render   # renders the 6-second sample into renders/
5. Keep one project folder per video
Inside the starter, create projects/my-reel and copy your recording in as source.mp4. Keep the untouched original somewhere safe too. Put any transcript in the same folder, B-roll and sound in an assets subfolder, and each revision in its own v01, v02 or v03 folder.
Why: the agent works from one folder instead of searching your whole computer, and a bad revision never overwrites a good one.
6. Write the direction before you ask for an edit
Fill in the template below and save it in your project folder as direction.md. This is the part the Reddit editors were right about: the agent can cut, but it can't decide what your video is for. One main point, one audience, and a short list of what must stay.
If you're unsure of the main point, work it out in a regular ChatGPT chat first, then paste the finished direction into Codex. For the prompt shape, see how to prompt like an operator.
Why: vague asks get generic edits. A written direction gives you something to judge the result against in step 12.
VIDEO: projects/my-reel/source.mp4
AUDIENCE: [who is watching, e.g. med spa owners]
MAIN POINT: [the one idea they should remember]
TARGET LENGTH: [e.g. 45 seconds, vertical]
MUST KEEP: [lines, pauses or repetition that are deliberate]
CUT: [mistakes, false starts, dead air, tangents]
HOOK: [the question or claim the video answers]
LOOK: two-line title, accent color on line one, white on line two, no big panel, face clear
B-ROLL I HAVE: [file names and what each one shows]
DON'T: invent speech, upload anything new that costs money, or overwrite earlier versions
7. Inspect the video and get word timings
Tell Codex to inspect your source file and report duration, orientation, frame rate, audio tracks, and whether the color metadata says HDR or SDR (ffprobe reports all of these). Then have it reuse your transcript or suggest a way to transcribe.
ElevenLabs speech to text is optional. If you use it, copy .env.example to .env and add your own key locally. The starter never calls a transcription service on its own. Done when you have checked word timings and no key was pasted into the chat.
Why: an iPhone HDR clip treated as normal video comes out washed out, and cuts are only as precise as the word timings behind them.
8. Make the clean cut first
Paste the edit prompt from Starter prompts below along with your direction. Ask for the clean talking-head cut before any effects. Review the sentences it wants to keep and protect any repetition you meant. Save the kept ranges in keep.json, then run the cutter once they make sense. It writes a time map next to the edited video.
Done when the cut is tight and means the same as your original. Listen at every join before moving on.
Why: if the talking head doesn't work on its own, no title or B-roll will save it.
python3 scripts/cut.py projects/my-reel/source.mp4 projects/my-reel/keep.json projects/my-reel/v01/cut.mp4

# keep.json uses ORIGINAL source seconds, for example:
# {"keep": [[0.2, 3.5], [5.1, 8.0]]}
# Replace these sample ranges with the reviewed ranges for your own video.
9. Make the hook readable
Tell Codex to apply presets/two-line-impact.json to a new composition for your cut. Ask for 3 short hook options and pick one the video answers. To choose between them, score the hooks before you post. Mine became STOP on line one and SELF-SABOTAGE on line two. Accent color on the first line, white on the second, both clear of your face.
Done when both lines read at phone size with no big rectangle covering you.
Why: most people watch on a phone. A title that looks premium on a laptop can be unreadable at phone size.
10. Swap decoration for B-roll that shows the point
Give the agent your local B-roll files and tell it which spoken idea each one should show. Have it log the source ranges it uses so no shot repeats by accident. For my accountability section we used partner exercise footage, then group curls later. Remove tiny stage labels and decorative rails.
Done when each visual explains the sentence being spoken. If it doesn't help, cut it.
Why: agents like adding graphics. Every extra element competes with your face and your point.
11. Give the sound a place to land
Start with one short opening effect in a gap in your speech. Ask for a gentle push-in to match, then watch the first few seconds. Say exactly what's wrong: the gap is too long, the effect cuts into a word, or the music is too loud. If a reaction beat gets inserted, have the agent shift every later track by the same amount. Use your own licensed assets.
Why: sound placed over a word makes you hard to understand, and one inserted beat can knock everything after it out of sync.
12. Review the file that will be posted
Ask Codex to run the HyperFrames check and render a new MP4. Open the export, not the editing preview. Watch it at normal speed and phone size, and listen to the cuts. Go through the review rules below, note each issue with a timestamp, then ask for a new version that fixes them. Give one concrete note at a time.
Done when you have a finished file, the editable project and a record of what was checked. A passing automated check doesn't prove the edit feels right.
Why: the export is what your audience sees. Previews can hide encoding problems, audio pops and color shifts.
REVIEW RULES (watch the exported MP4 at phone size)
[ ] Does the video make the MAIN POINT from direction.md?
[ ] Hook readable in the first seconds, clear of my face
[ ] Every cut: no clipped words, no audio pops
[ ] Captions in sync after the cuts
[ ] No important part of my face or hands cropped off
[ ] No repeated B-roll shot
[ ] No tiny unreadable labels
[ ] Color looks like the original, not washed out
[ ] Sound effects land in gaps, music under my voice
Each issue: timestamp + what's wrong + what I want instead
Starter prompts
Paste these as written. They are short on purpose, because the long ones drift.
I want to edit this real recording into a tight vertical reel. Source: [FILE]. Audience: [WHO]. Main point: [ONE IDEA]. Target length: [DURATION]. My full direction is in direction.md. Use Codex with local files, HyperFrames for graphics and rendering, and FFmpeg where needed. Inspect the source and reuse my transcript if available. Remove mistakes, accidental repeats and dead space without changing my meaning. Save the source keep ranges and retime captions after cuts. Keep my opening title to exactly two lines. Use a bold accent color and white text, no big panel. Add B-roll only where it explains the spoken words. Give every graphic a purpose. Keep the face clear. Use my authorized assets and ask before a new paid upload. Create a new version, preserve everything already approved, and check the encoded video before calling it finished.
Review this encoded reel against direction.md. Check the opening, cut boundaries, captions, face crops, repeated footage and small unreadable labels. Give each finding a timestamp and a specific fix. Do not claim you listened if only visual inspection was possible. Apply approved fixes to a new version.
Package the approved two-line title layout as a reusable preset. Expose text and palette. Preserve its hierarchy and keep the background panel off. Use only fonts we are allowed to redistribute, or make the font a user-supplied asset. Exclude private media and credentials.
Using Claude Code instead of Codex
HyperFrames isn't tied to Codex. Its README says the skills work with Claude Code, Cursor, Gemini CLI, Codex and other agents that support skills. My starter was built and tested with Codex on a Mac, so treat this path as the same workflow with a different agent, and run the 6-second test first.
Install Claude Code
Anthropic's Claude Code overview lists a desktop app (open the Code tab, paid Claude subscription required) and a terminal version. Steps 2 to 3 above still apply: set permissions first, and install Node.js 22, Python 3 and FFmpeg.
Add the HyperFrames skills
In your project folder, run the command below. The HyperFrames quickstart says to choose Core Skills in the picker. The README lists a /talking-head-recut skill for adding designed overlays to an existing talking-head video, and /embedded-captions for captions. If you want more on how skills work, see Claude skills.
Use the same direction and review rules
Open the starter folder in Claude Code, paste the same direction.md and edit prompt, and ask it to follow docs/WORKFLOW.md. The review rules in step 12 don't change with the agent. If you want Claude to remember your title style across sessions, put it in a CLAUDE.md file.
If this happens, do this
Every one of these has happened to me or to someone I set this up for.
| Failure | Fix |
|---|---|
| "command not found" for node, npm or ffmpeg | The tool isn't installed or the terminal was open before you installed it. Close and reopen the terminal, then run the version checks in step 3 again |
| npm install or the first render seems stuck | The first run downloads packages and a browser. Give it a few minutes, and approve the network request if Codex asks |
| Codex keeps asking for approval | That's the safety setting doing its job. Read each request; approve installs you started, and say no to anything outside your project |
| Captions drift after cuts | Use the original-to-edited time map, not original timestamps against the trimmed file |
| The title looks premium on desktop but tiny on a phone | Fewer words, two lines, and a phone-size review |
| A label is blocked by arrows | Put labels and connectors on separate layers, and end lines at the shape's edge |
| The design feels busy | Delete decorative markers and give one idea the frame |
| The same shot repeats | Track used footage ranges and pick another shot |
| A reaction beat knocks the audio out of sync | Shift picture, captions, B-roll and sound by the same inserted duration |
| The image looks washed out | Check color metadata and tone mapping before touching contrast |
| Checks pass but the export looks wrong | Look at frames from the exported file and listen to it. An automated check isn't a visual review |
The tools I use for this
| Tool | What it is for here | |
|---|---|---|
| ChatGPT desktop app (Codex) | Where Codex lives since July 2026; the agent that runs this edit on your files. | Docs |
| HyperFrames | HeyGen's free, open-source HTML-to-video renderer. | Source |
| AI CEO Lab video-editing starter | The sample, cutting script, title preset and editing brief used in this tutorial. | Get it |
| FFmpeg | Media inspection, cuts and audio processing. | Docs |
| Node.js | Runs HyperFrames on your computer. Version 22 or newer. | Download |
| ElevenLabs | Optional word-level transcription with your own account. | Docs |
| Claude Code | Optional alternative agent for the same workflow. | Docs |
Before your second video
- Give one note at a time. A timestamp and one specific problem gets fixed. Five notes in one message get half-fixed.
- Save every approved look as a preset. Once a title style works, have Codex package it with the Save the style prompt, so you stop re-describing it.
- Keep private footage out of anything you share. Client media and credentials stay outside the files you'd put on GitHub or send to a team member.
- Show the review, not only the result. If you tell people a tool edited your video, be clear that you directed and checked it.
- Cutting shorts from a long recording? That's a different job. See the long-recording-to-shorts tutorial, which uses Claude and DaVinci Resolve.
Questions people ask
What is HyperFrames?
HyperFrames is a free, open-source framework from HeyGen that turns HTML, CSS, media and animations into MP4 videos. It's built so AI coding agents like Codex and Claude Code can write the video as a web page and render it. Source and docs are on GitHub.
Is HyperFrames free?
Yes. It's open source under the Apache 2.0 license, with no seat count, per its GitHub page (checked 15 September 2026). You still pay for whatever agent you run it with, and for optional services like transcription.
Can ChatGPT edit videos?
A regular ChatGPT chat can help you plan an edit, but it doesn't work in your folders and run editing tools on your footage. Codex, which has been inside the ChatGPT desktop app since 9 July 2026, can, when you pair it with HyperFrames and FFmpeg as in this tutorial.
HyperFrames vs Remotion: which should I use?
Both render video from web code. Remotion uses React and is free for individuals and companies up to 3 employees, then paid, per its license. HyperFrames uses plain HTML under Apache 2.0. If an agent writes the code for you and you run a business with staff, HyperFrames is simpler to start with. If your team already builds in React, HeyGen's own comparison says Remotion fits.
Can I use HyperFrames with Claude Code?
Yes. The HyperFrames README says its skills work with Claude Code, and you add them with npx skills add heygen-com/hyperframes. The Claude Code section above walks through it. My starter was tested with Codex, so run the 6-second test first.
Do I need to know how to code?
No. The agent writes the code. You'll paste a few install commands once, and you need to be comfortable reading an error message and pasting it back to Codex. The real skill is writing a clear direction and reviewing the result.
Will AI replace video editors?
It can replace the software work for simple formats like talking-head reels. It doesn't replace the decisions. In the September 2026 r/VideoEditing thread on this, the top reply said the value an editor provides is knowing what to edit. Businesses that don't want to make those calls still need an editor.
The free skill
The repeatable editing procedure: check the tools, write the direction, inspect the source, plan the cuts, retime the words, apply a clean two-line hook, add relevant B-roll and review the exported file.
---
name: edit-videos-chatgpt-hyperframes
description: Turns a real talking-head recording into a tight vertical reel with a local editing agent (Codex in the ChatGPT desktop app, or Claude Code), HyperFrames and FFmpeg. Checks the tools, works from a written direction, inspects the source, plans cuts from word timings, applies a two-line hook, adds B-roll that shows the spoken point, and reviews the exported file before calling it done. Trigger on "edit this recording into a tight reel".
---

# Edit my video

Use an agent with authorized local file access and a terminal. Tested setup: Codex in the ChatGPT desktop app (Codex merged into that app on 9 July 2026). HyperFrames skills also support Claude Code and other skill-capable agents. A regular chat without file and command access can help write the direction, not do the edit.

## Safety first
- Work only inside the chosen project folder. Ask before editing files outside it or running commands that need the internet.
- Never use full-access mode unless the user says so for this task.
- Never ask for an API key in chat. Keys go in a local `.env` copied from `.env.example`, never committed.
- Never publish, post, message or start a paid upload without the user's explicit yes.

## Before you start
1. Read the project README, docs/EDIT-BRIEF.md and docs/WORKFLOW.md.
2. Confirm the tools run. If any command fails, explain in plain words what's missing and how to install it (Node.js LTS installer from nodejs.org; FFmpeg via `brew install ffmpeg` on Mac or `winget install ffmpeg` on Windows). Fix this before touching footage.
```
node --version      # 22 or newer
python3 --version
ffmpeg -version
npm install         # first run downloads packages; may need network approval
npm run check
npm run render      # renders the 6-second sample into renders/
```
3. Set up one folder per reel. Never edit the original.
```
projects/my-reel/
  source.mp4        # copy of the recording, original kept elsewhere
  direction.md      # the user's written direction
  transcript        # if one exists
  assets/           # B-roll and sound
  v01/ v02/ v03/    # one folder per revision
```

## Get the direction
If direction.md is missing or vague, ask for these before editing. Do not guess the main point.
```
VIDEO / AUDIENCE / MAIN POINT / TARGET LENGTH
MUST KEEP (deliberate lines, pauses, repetition)
CUT (mistakes, false starts, dead air, tangents)
HOOK (the question or claim the video answers)
LOOK (two-line title, accent line one, white line two, no panel, face clear)
B-ROLL I HAVE (file names and what each shows)
DON'T (invent speech, paid uploads, overwrite versions)
```

## The edit, in order
1. **Inspect the source.** Report duration, orientation, frame rate, audio tracks, and whether color metadata says HDR or SDR.
2. **Get word timings.** Reuse an existing transcript first. Ask before any new paid upload.
3. **Plan the cut.** Propose a story and keep ranges in original source seconds that serve the MAIN POINT. Never invent speech. Keep meaningful pauses and intentional repetition. Get the user's review of the ranges before cutting.
4. **Cut picture and audio together.** Save the original-to-edited time map and retime captions and cues from it.
```
python3 scripts/cut.py projects/my-reel/source.mp4 projects/my-reel/keep.json projects/my-reel/v01/cut.mp4
# keep.json: {"keep": [[start, end], ...]} in ORIGINAL source seconds
```
5. **Hook.** Apply `presets/two-line-impact.json`. Offer 3 short hook options and let the user pick one the video answers. Exactly two lines: bold accent color on line one, white on line two, no big panel, face clear. Shorten the words rather than shrinking the text.
6. **Graphics.** One useful concept graphic at a time. Hide future stages until they're revealed. Drop tiny decorative markers, stage labels and rails.
7. **B-roll.** Use authorized local files that show the spoken idea. Log used source ranges so no shot repeats. Keep client result pairs truthful and get permission before using them.
8. **Sound.** Place effects in speech gaps. When inserting a reaction beat, shift picture, captions, B-roll and sound by the same duration. Use licensed assets, a suitable music bed, and measure the final mix.
9. **Check.** Run the installed HyperFrames checks, then render to a new file. Inspect frames from the exported file at phone size and listen to every join. If you can't listen, say so plainly.
10. **Deliver.** Editable project, export, cut map and verification notes.

## Review rules (run on the exported MP4, not the preview)
Give every finding a timestamp, what's wrong and a specific fix. Apply approved fixes to a new version, one note at a time.
- Does the video make the MAIN POINT from direction.md?
- Opening: hook readable at phone size, clear of the face
- Every cut boundary: no clipped words, no audio pops
- Captions: in sync after cuts
- Face crops: nothing important cut off
- Repeated footage
- Small unreadable labels
- Color: not washed out
- Sound effects in gaps, music under the voice

## If this happens
- "command not found" for node, npm or ffmpeg: the tool isn't installed or the terminal predates the install. Reopen the terminal and rerun the version checks.
- First install or render seems stuck: it's downloading packages and a browser. Wait, and request network approval if needed.
- Captions drift after cuts: use the time map, not original timestamps against the trimmed file.
- Title tiny on a phone: fewer words, two lines.
- A label blocked by arrows: separate label and connector layers, end lines at the shape edge.
- The design feels busy: delete decoration, give one idea the frame.
- A shot repeats: check the used-ranges log and pick another.
- Audio out of sync after a reaction beat: shift every later track by the inserted duration.
- Washed-out image: check color metadata and tone mapping before touching contrast.
- Checks pass but the export looks wrong: automated checks aren't a visual review. Look at the exported frames.

## Claude Code users
Install the HyperFrames skills in the project folder with `npx skills add heygen-com/hyperframes` and choose Core Skills. `/talking-head-recut` adds designed overlays to an existing talking-head video and `/embedded-captions` adds captions. The starter was tested with Codex, so run the 6-second render first. Everything above still applies.

## Save the style
Once the user approves a look, package it as a preset. Expose text and palette, keep the hierarchy, background panel off. Use only fonts you're allowed to redistribute, or make the font a user-supplied asset. Exclude private media and credentials.

## Done when
One real recording is edited and reviewed against the written direction, the original is intact, every change lives in a new version, the cut map and transcript agree, and the user has the export plus notes on what was checked.
Build a workflow you can use again
AI CEO Lab is where we turn a successful session into a repeatable system, with the files, review rules and lessons that make the next recording easier.